Managed CloudN Workflows
Introduction
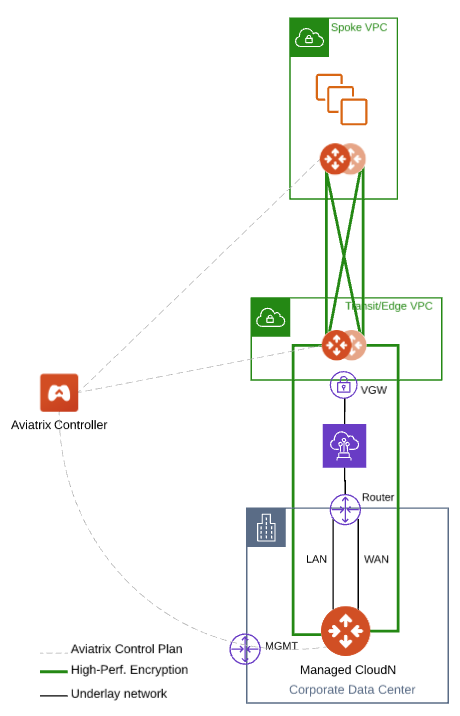
The Aviatrix CloudN hardware appliance is deployed on-prem to connect to public cloud. It provides up to 25Gbps encryption performance over AWS Direct Connect and Azure ExpressRoute.
Aviatrix Managed CloudN enables you to manage CloudN hardware appliances by having the Aviatrix Controller register and manage the CloudN device.
Benefits
-
Ease of use:
-
Centrally manage all CloudN appliances from Aviatrix Controller without logging into each Standalone CloudN GUI individually for ongoing configuration and operation actions.
-
Simplify connection configuration by removing manually importing S2C IPsec configuration method as in Standalone CloudN.
-
-
Enhanced visibility and troubleshooting:
-
Perform running diagnostics, upload tracelog and upgrade on Managed CloudN device the same way as an Aviatrix Gateway.
-
Support backup/restore function
-
-
Active Mesh support:
-
Managed CloudN automatically load balance traffic to both Aviatrix Transit Primary Gateway and backup gateway
-
-
Scalability:
-
Support scale-out fashion to achieve higher IPsec throughput
-
|
For more information and benefits about CloudN, please check out the below documents:
This document describes a step-by-step Managed CloudN deployment workflow for R6.2 and later. It covers the following topics.
-
Workflow on Aviatrix CloudN
-
Workflow on Aviatrix Controller
-
Traffic Flow Verification
-
Troubleshooting Tips
-
Upgrade
-
Backup/Restore
-
Workflow on cleanup
-
FAQ
Prerequisites
-
Order a CloudN appliance and install it properly in your data center or data center provider.
-
(Optional) Create and register an FQDN Name for Aviatrix Controller public IP. This is useful if the Controller has HA configured.
-
Remove the current connection. Skip this step if this is a new deployment. Remove/delete any Site2Cloud (IPsec) connection between Aviatrix Transit Gateway and Standalone CloudN if you have any in your existing Standalone CloudN deployment.
-
Upgrade Aviatrix Controller to the latest version.
-
Deploy VPC/VNets, Aviatrix Multicloud Transit Gateways, and Spoke Gateways. Follow this step to launch Aviatrix Transit gateway with insane mode enabled. The recommended minimum size for Transit in AWS is c5n.4xlarge. Please refer to this doc for performance details.
| Notes: You can attach a non-HPE Mode Spoke gateway to HPE Mode Transit Gateway. |
-
(Optional) Follow this doc to attach an Aviatrix Spoke Gateway to an Aviatrix Transit Gateway.
| In this example, Aviatrix Multicloud Transit Gateway and Aviatrix Spoke Gateway with HPE are deployed in AWS platform. The workflow also applies to Azure. |
Workflow on Aviatrix CloudN
Opening Controller Inbound Ports
CloudN is deployed inside a data center. It does not require any public IP addressees. However, you need to collect the public IP for the management interface (The ISP provided pubic IP) and open port 443 on the Controller for that public IP.
For AWS accounts, update the Aviatrix Controller’s inbound security group to allow TCP 443 from public IP address of the router of CloudN’s MGMT interface.
-
Open your AWS console and find the security group associated with Aviatrix Controller.
-
Configure an inbound security rule to allow TCP 443 from public IP address provided by the ISP where CloudN’s management interface egresses to Internet.
This public IP address needs to be static.
Configuring NTP Sync and SMTP Services
-
Add a firewall rule to allow CloudN’s MGMT outbound UDP port 123 access to ntp.ubuntu.com or to a local NTP server.
-
From the CloudN UI, go to Setting > Controller > System Time. Enter ntp.ubuntu.com or a local NTP server then select the Sync option.
-
Do a manual sync to the NTP server.
-
From the CloudN UI, go to Setting > Controller > Email, Setup SMTP settings to allow CloudN to send alert email.
Logging into the CloudN GUI
-
Open a browser and navigate to the CloudN GUI with CloudN domain name/IP and port 443.
-
Sign in with your CloudN login credentials.
(Optional, Rare) Checking Whether CloudN Requires a Controller IP Migration
Skip this optional step if the Controller IP address has not been changed.
-
Navigate to Troubleshoot on the left sidebar > Diagnostics > Network.
-
Scroll down to the Controller Public IP section in the bottom right.
-
Perform Controller IP Migration function if the message in the Controller Public IP section guides users to execute it.
For private link connectivity such as AWS Direct Connect or Azure Express Route case, CloudN WAN interface is assigned a private IP, so the message in the Controller Public IP section displays the public IP of this Controller as "NA. The Controller was not able to reach www.carmelonetworks.com through the WAN interface(eth0)."
Managed CloudN Management Port Outbound Access
You must use the specified FDQN, IP address, and ports for Managed CloudN (registered to the Controller) and Standalone CloudN (de-registered from the Controller) implementations. Please see Required Access for External Sites (registration required; if you are not already registered you can sign up at https://support.aviatrix.com).
| CloudN does not support configuration of two interfaces in the same Layer 2 (L2) domain or subnet. Aviatrix recommends to configure the WAN, LAN, and Management interfaces on different subnets. |
To check basic connectivity to Internet from CloudN device and to troubleshoot reachability issue to these addresses, follow the steps below.
-
Navigate to Troubleshoot on the left sidebar > Diagnostics > Network.
-
Find the Network Connectivity Utility section.
-
Enter the following information in the fields provided.
Field |
Value |
Hostname |
Refer to the FQDN/IP address on the Aviatrix Support website. |
Port |
Refer to the PORT on the Aviatrix Support website. |
Gateway Name |
Controller |
Protocol |
TCP |
-
Click Go to check connectivity.
Registering with Aviatrix Controller FQDN Name
-
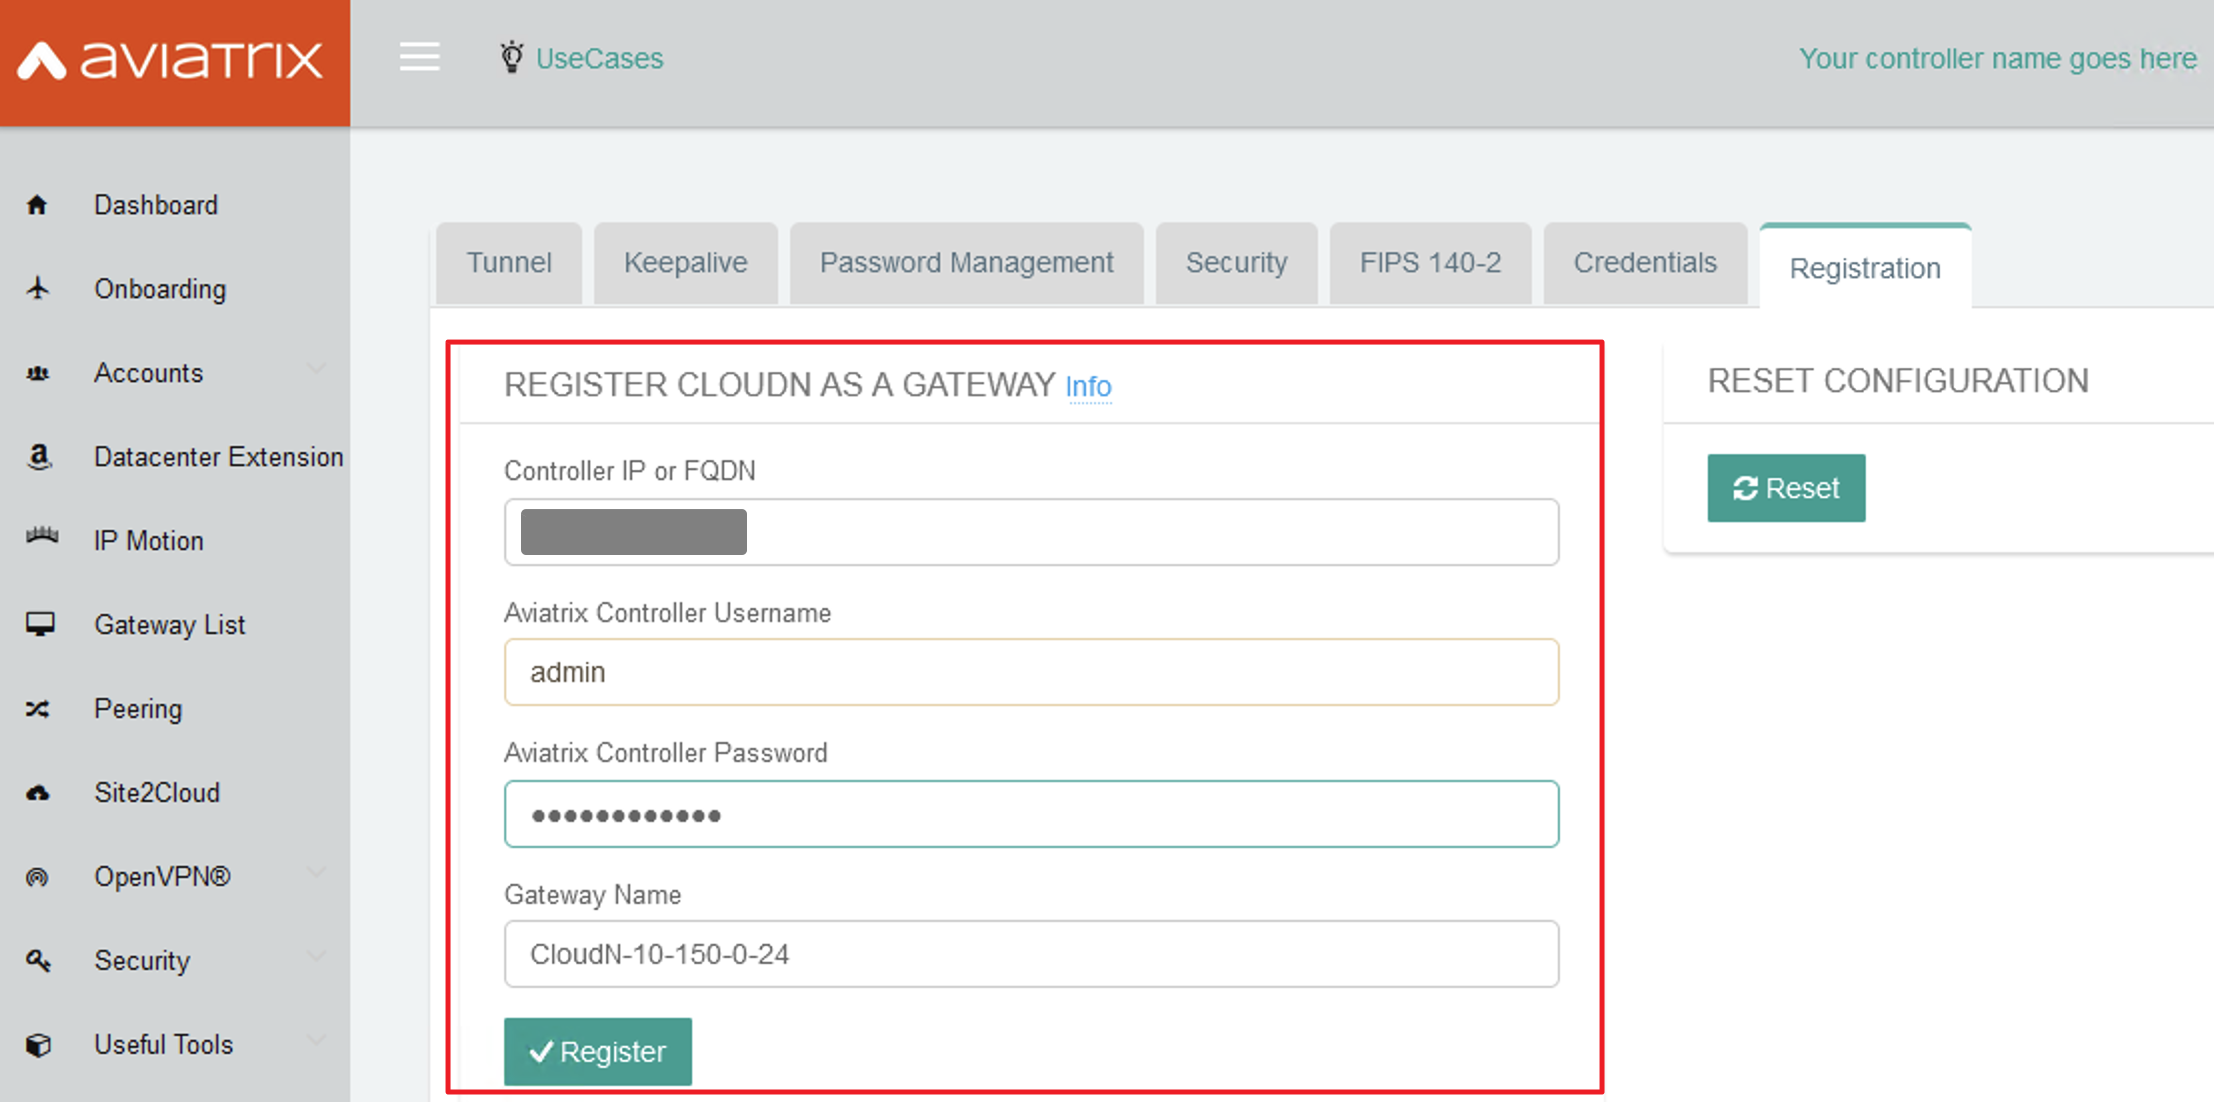
Navigate to Settings on the left sidebar > Advanced > Registration or select the Managed CloudN under UseCases dropdown menu on the top.

-
Open the Register CloudN as a Gateway section.
-
Enter the Aviatrix Controller FQDN name.
|
It is highly recommended to register CloudN with Aviatrix Controller’s FQDN name instead of its IP address for allowing Controller HA operation (allows the controller to be assigned to a different IP address). When your Aviatrix Controller’s FQDN is mapped to a private IP address, make sure that CloudN’s MGMT primary DNS server or secondary DNS server can resolve the FQDN to its private IP address. Registering CloudN to Aviatrix Controller via private networks is not a fully supported scenario; please discuss this with the Aviatrix team during the planning phase before you finalize the design for the Managed CloudN deployment. |
-
Enter Aviatrix Controller Username/Password with an admin or CloudN user credential (any users in admin RBAC Groups or an RBAC Group with the CloudN permission enabled).
-
Enter the Gateway Name to represent this CloudN device.
-
Click Register.
-
Click OK to confirm. Wait about 40-60 seconds to complete the registration process.
Workflow on Aviatrix Controller
-
Log in to the Aviatrix Controller.
-
Check if a Managed CloudN device is connected to Aviatrix Controller properly. Navigate to CloudN > List/Edit and search for the Managed CloudN device. Make sure it is displayed as "registered" in the State column.

(Optional) Discover a Managed CloudN Device WAN Interface
This step is for building connections over the Internet. If you are building connections over Direct Connect or ExpressRoute, proceed to the next step.
-
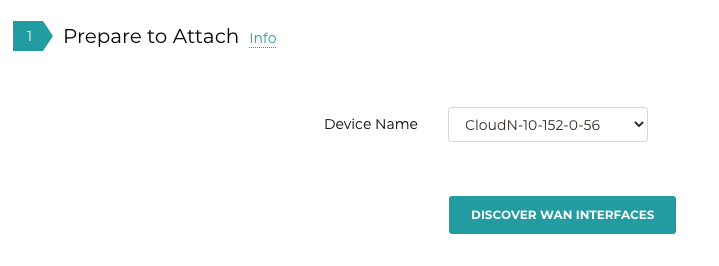
Navigate to CloudN > Attach and find the 1. Find the Attach section.
-
Select the Managed CloudN device.
-
Click Discover WAN Interfaces.
-
Select the WAN interface in the dropdown menu.
-
Update the WAN primary interface and IP if needed.
-
Click Apply.
Attaching Managed CloudN
-
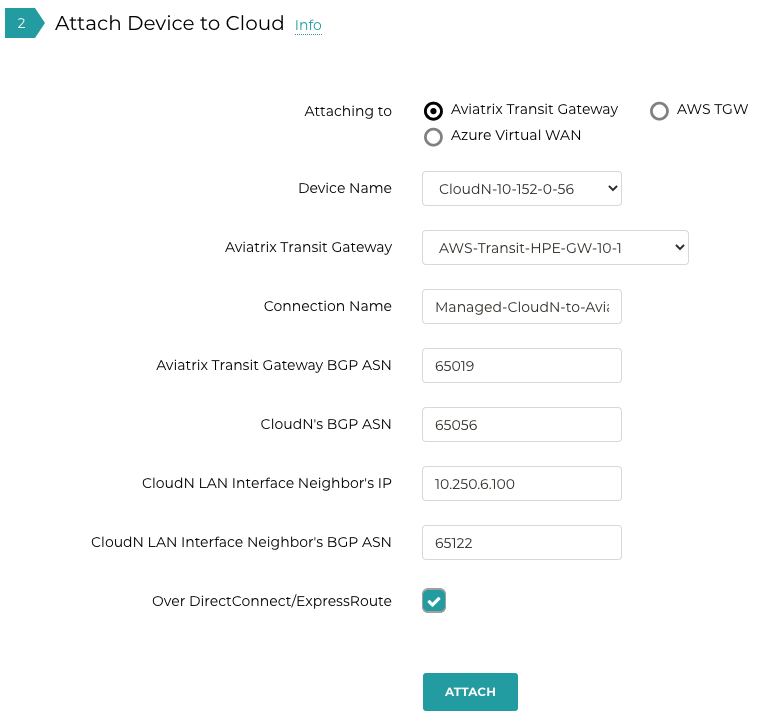
Navigate to CloudN > Attach.
-
Scroll down to 2. Attach Device to Cloud.
-
Select the Aviatrix Transit Gateway radio button.
-
Enter the following information in the fields below.
| Field | Value |
|---|---|
Device Name |
Select the Managed CloudN device |
Aviatrix Transit Gateway |
Select an Aviatrix Transit Gateway |
Connection Name |
A unique name for the connection (i.e. Managed-CloudN-to-Aviatrix-Transit-GW-connection) |
Aviatrix Transit Gateway BGP ASN |
Only BGP is supported. Enter BGP ASN number on Aviatrix Transit Gateway. (i.e. 65019) |
Device’s BGP ASN |
Only BGP is supported. Enter BGP ASN number on the Managed CloudN device. (i.e. 65056) |
Algorithms |
Leave this checkbox unmarked. |
Enable Global Accelerator |
Check the box to enable AWS Global Accelerator for the branch router to hop onto the nearest AWS edge and traverse the AWS backbone to get to the Aviatrix Transit Gateway. |
Pre-shared key |
Leave this checkbox unmarked. |
Local Tunnel IP |
Leave this checkbox unmarked. |
Remote Tunnel IP |
Leave this checkbox unmarked. |
-
Click Attach.
Check Whether the Managed CloudN Device is Attached to Aviatrix Transit Gateway Properly
-
Navigate to CloudN > List/Edit.
-
Search for the Managed CloudN device.
-
Check the state is displayed as "attached" in the State column.

|
The status "attached" here reflects only the management operation state, it does not reflect the attached connection state in real time. Please go to Site2Cloud page to monitor the connection status as shown below. |
Traffic Flow Verification
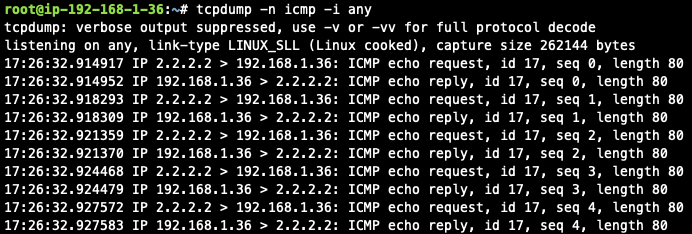
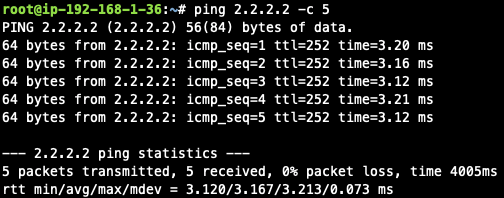
Traffic Flow Verification example was exercised after S2C connection(s) is up and BGP connection(s) is established. The on-premise router is Cisco IOS with network loopback address 2.2.2.2/32. Aviatrix Transit VPC/VNet is 10.1.0.0/16. Aviatrix Spoke VPC/VNet is 192.168.1.0/24 and the private IP of the testing VM is 192.168.1.36/32.
-
Traffic from on-premise router Cisco IOS to cloud VM
-
Issue ICMP traffic from on-prem loopback interface to a Virtual IP of cloud instance

-
Execute packet capture on the cloud instance
-
-
Traffic from cloud VM to on-premise router Cisco IOS
-
Issue ICMP traffic from cloud instance to on-prem loopback interface address
-
CloudN States
The Registered Devices table on the CloudN > List tab shows the state of the CloudN device and the reason for that state.
-
Registered:
-
The CloudN device is registered to the Aviatrix Controller and ready for attachment to a Transit Gateway. You can deregister the CloudN gateway if desired.
-
You can run diagnostics on a registered CloudN device.
-
-
Attached:
-
The CloudN device is attached to a Transit Gateway. This status only reflects the management operation state; it does not reflect the attached connection state in real time. To check connectivity, you can check connection status on the Site2Cloud page; check the BGP connection; and verify the traffic flow.
-
You can run diagnostics on an attached CloudN device.
-
You cannot deregister unless you detach the gateway first.
-
-
Check: The CloudN device is not connected to the Aviatrix Controller. You cannot run diagnostics, or deregister the device. You can investigate by doing the following:
-
Examine the security policy of the Controller instance and ensure that TCP port 443 is opened to traffic originating from the CloudN device public IP address. See here for more information.
-
Examine the security policy of the CloudN device and make sure that TCP port 443 is opened to traffic originating from the Controller public IP address. This rule is inserted by the Controller during device creation. Please restore if it was removed.
-
Make sure network ACLs or other firewall rules are not configured to block traffic between the Aviatrix Controller and the CloudN device over TCP port 443.
-
Check basic connectivity to the internet from the CloudN device. See here for more information.
-
Troubleshooting Tips
When an CloudN registers with an Aviatrix Controller properly as a Managed CloudN device, users can perform troubleshooting on a Managed CloudN device the same way as an Aviatrix Gateway in the cloud via Aviatrix Controller GUI.
| Direct access to CloudN’s local HTTPs URL/UI is still allowed for only Troubleshoot/Diagnostic reasons; access to any other menu items is not recommended nor supported. |
Running Diagnostics
-
Navigate to CloudN > List/Edit in the Aviatrix Controller.
-
Search for the Managed CloudN device and select it.
-
Click Diag to display a dropdown menu.
-
Click Run.
-
Wait for a couple of minutes to complete the running diagnostics process.
-
Click Show to display the report.
-
Click Submit to upload the report to Aviatrix Support.

Upload Tracelog
-
Navigate to CloudN on the left sidebar > List/Edit.
-
Search for the Managed CloudN device and select it.
-
Click Diag to display a dropdown menu.
-
Click Upload Tracelog to upload tracelog to Aviatrix Support.

Download syslogs
-
Navigate to CloudN on the left sidebar > List/Edit.
-
Search for the Managed CloudN device and select it.
-
Click Diag to display dropdown menu.
-
Click on the button Download Syslog.

Force Upgrade
See Force Upgrade doc.
-
In the Aviatrix Controller, navigate to Troubleshoot on the left sidebar > Diagnostics > Gateway.
-
Open the Force Upgrade section.
-
Select the Managed CloudN device on the Gateway dropdown menu.
-
Click Upgrade to force upgrade the Managed CloudN device.

Upgrade
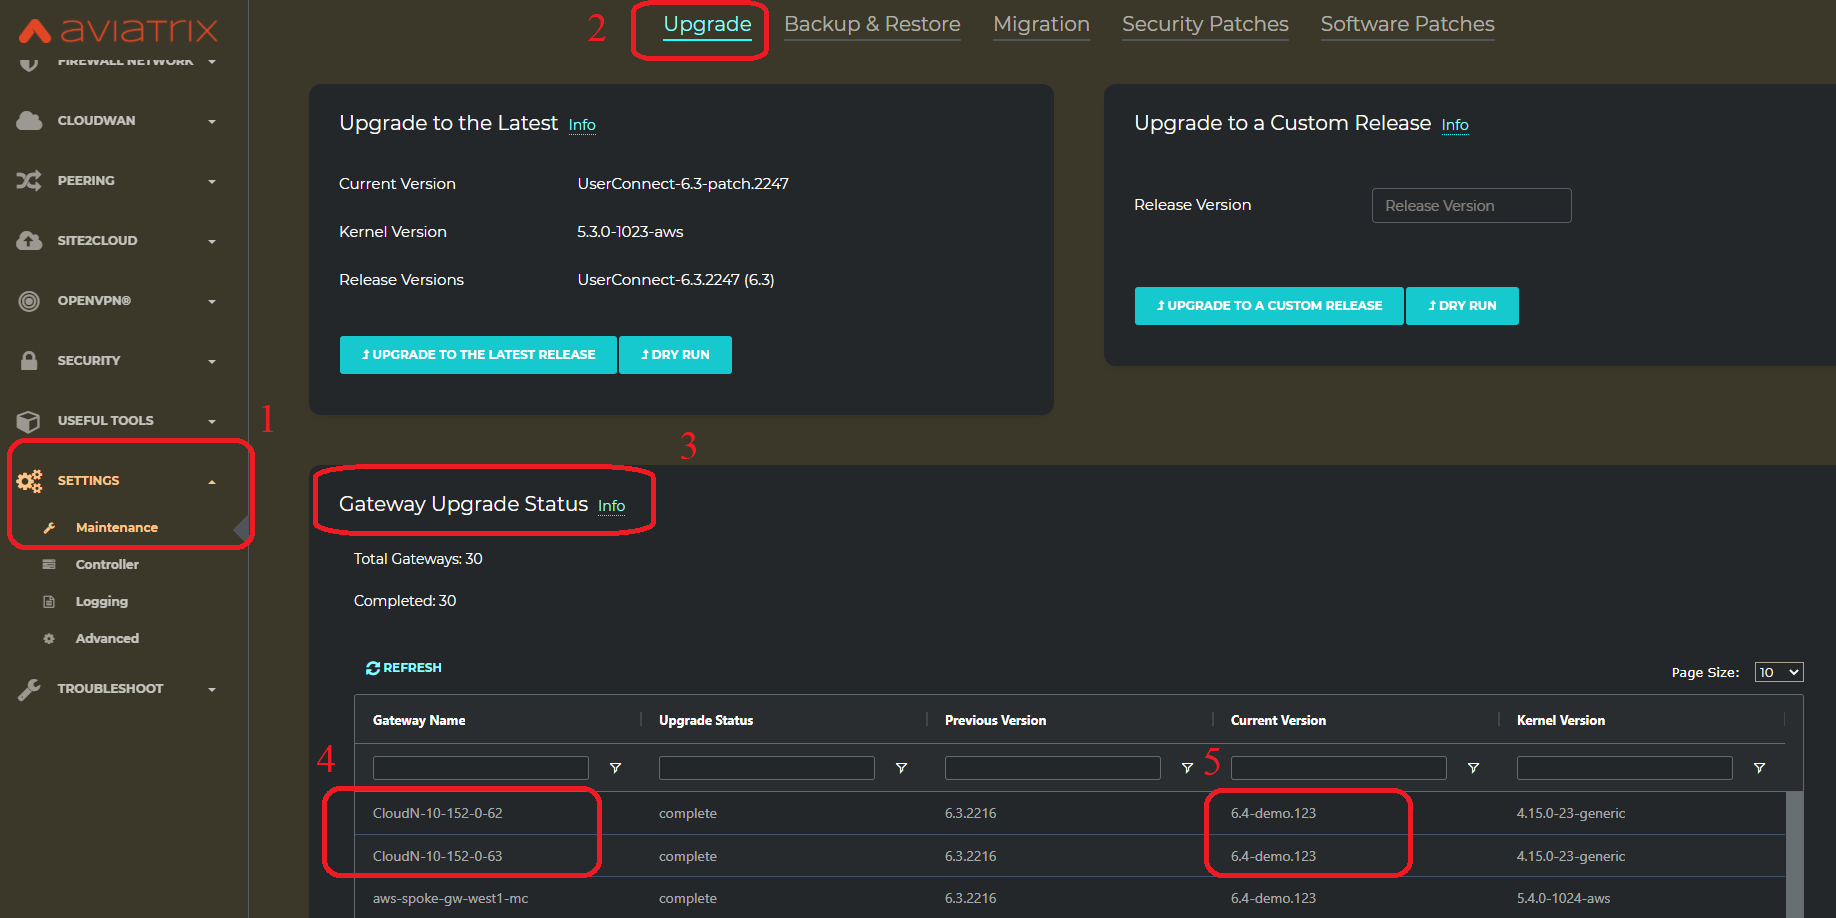
When a CloudN registers with an Aviatrix Controller properly as a Managed CloudN device, the upgrade process on the Managed CloudN device is treated the same way as an Aviatrix Gateway in the cloud when Aviatrix Controller is upgraded. Please refer to Inline Software Upgrade doc for upgrading a Managed CloudN device from Aviatrix Controller.
|
Backup and Restore
When a CloudN registers with an Aviatrix Controller properly as a Managed CloudN device, the backup/restore process on the Managed CloudN device is processed the same way as an Aviatrix Gateway in the cloud when the backup/restore function is performed on Aviatrix Controller. Please see the Controller Backup and Restore doc for details.
|
Performing backup/restore function for Managed CloudN device via CloudN GUI is not supported. |
Workflow on Cleanup
Detach a Managed CloudN device from Aviatrix Controller
Follow these steps to detach a Managed CloudN device from the Aviatrix Controller.
-
In your Aviatrix Controller, navigate to CloudN on the left sidebar > Attach.
-
Scroll down to Delete Function > 3 > Detach Device from Cloud.
-
Select the connection from the Attachment Name dropdown menu.
-
Click Detach to disconnect the connection.

Note that you can also deregister devices by navigating to CloudN on the left sidebar > List, selecting the connection from the list of Registered Devices, and clicking Deregister.

| If these steps cannot convert a Managed CloudN device back to a Standalone CloudN state properly, please proceed to the Reset Configuration section. |
Workflow on Reset Configuration
The Reset Configuration feature enables users to remove all configuration on a Managed CloudN device from a corrupted state to a clean state. Please follow the steps below in the Resetting Configuration section. This Reset Configuration feature is the last resort if users are not able to convert a Managed CloudN device back to a Standalone CloudN state through the steps above.
-
In your Aviatrix Controller, navigate to CloudN on the left sidebar > List/Edit.
-
Search for the Managed CloudN device and select it.
-
Click Diag to display dropdown menu.
-
Click Reset Configuration. Wait for a few minutes for the process to complete.

| Normally, when users reset a configuration, the Aviatrix Controller notifies Managed CloudN to perform this function. If Managed CloudN does not reset the configuration properly through the Aviatrix Controller, users need to execute the step below. |
(Optional) Perform feature "Reset Configuration" on CloudN GUI
Use the following steps to reset a device’s configuration if you are unable to do so through your Aviatrix Controller.
-
Open a browser and navigate to the CloudN GUI with CloudN domain name/IP and port 443.
-
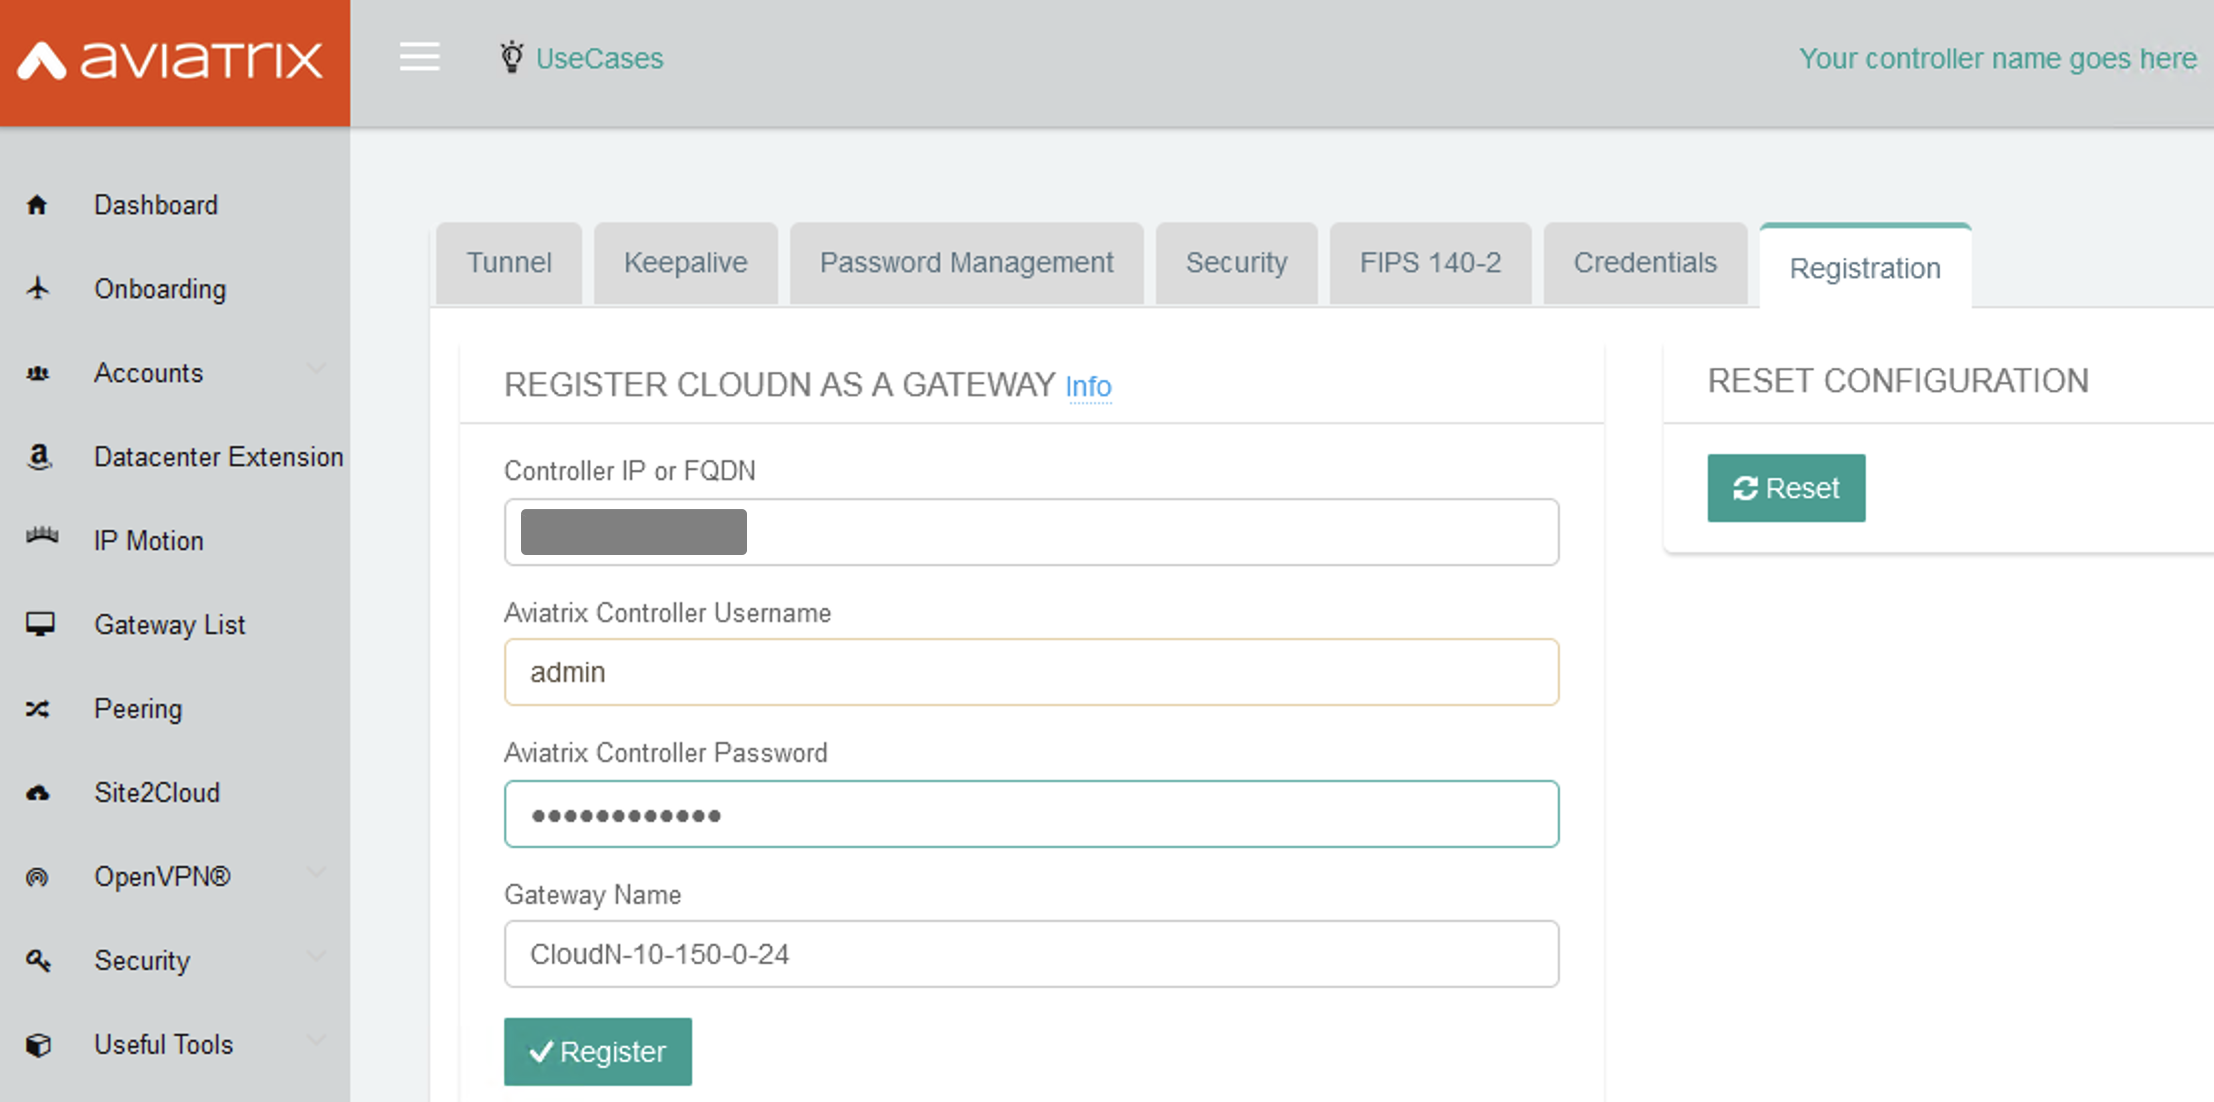
Sign in and navigate to Settings > Advanced > Registration or select Managed CloudN under UseCases dropdown menu on the top.

-
Find the Reset Configuration section and click Reset. Wait a few minutes for the process to complete.
| If you need any assistance to reset a configuration, please open a support ticket at Aviatrix Support Portal. |
User Guide for Redundant DX Deployment
Active/Active
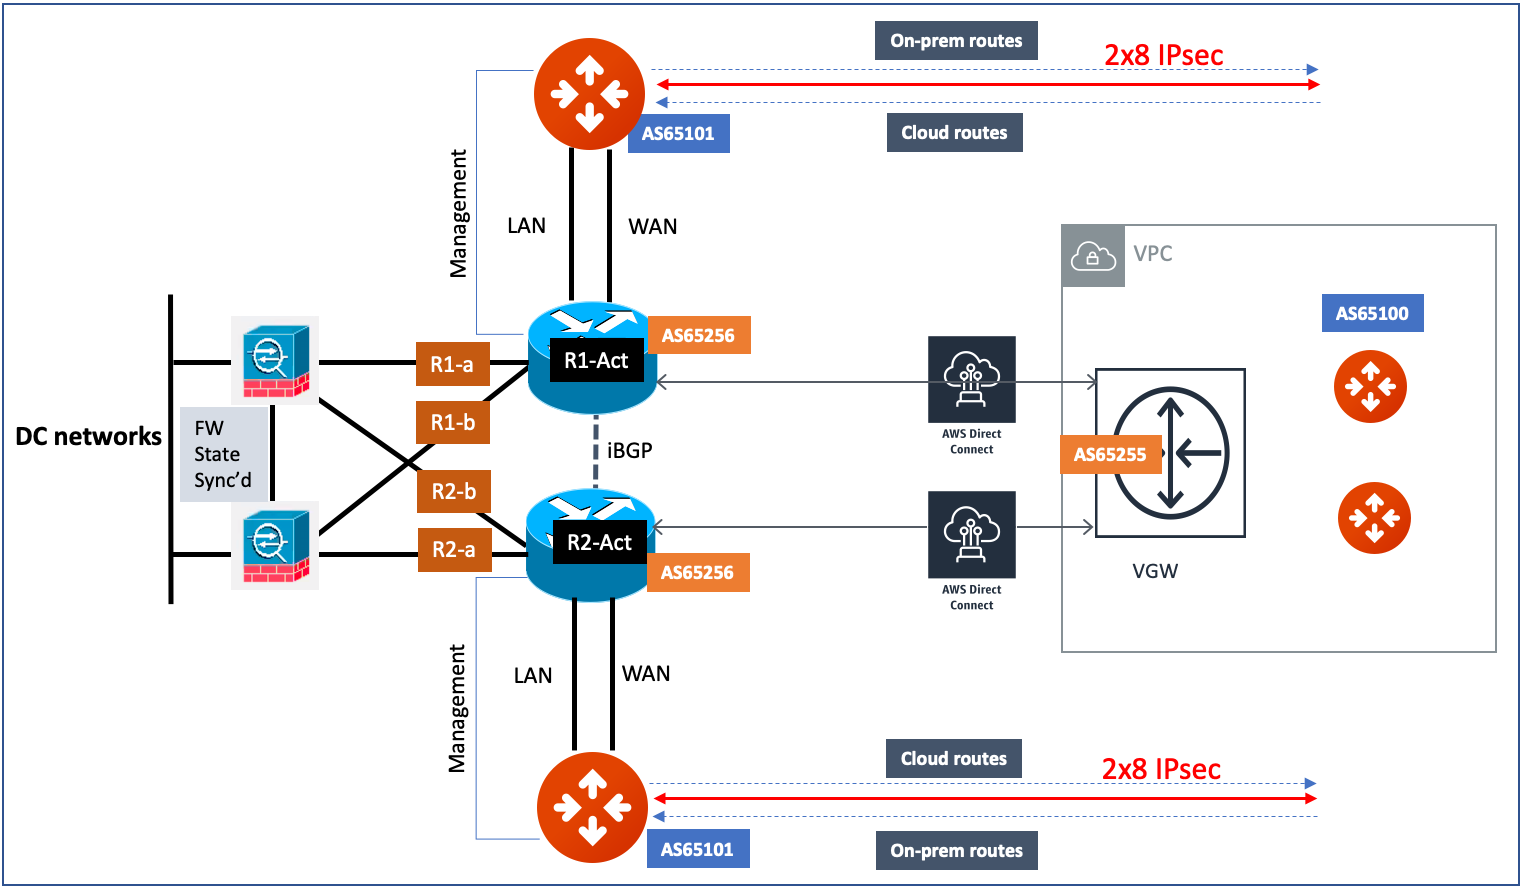
The Active/Active deployment model is recommended. In this deployment model, both CloudN appliances forward traffic and the underlying network links are fully utilized.
|
Aviatrix topology requirements:
On-prem topology requirements:
|
Active/Standby
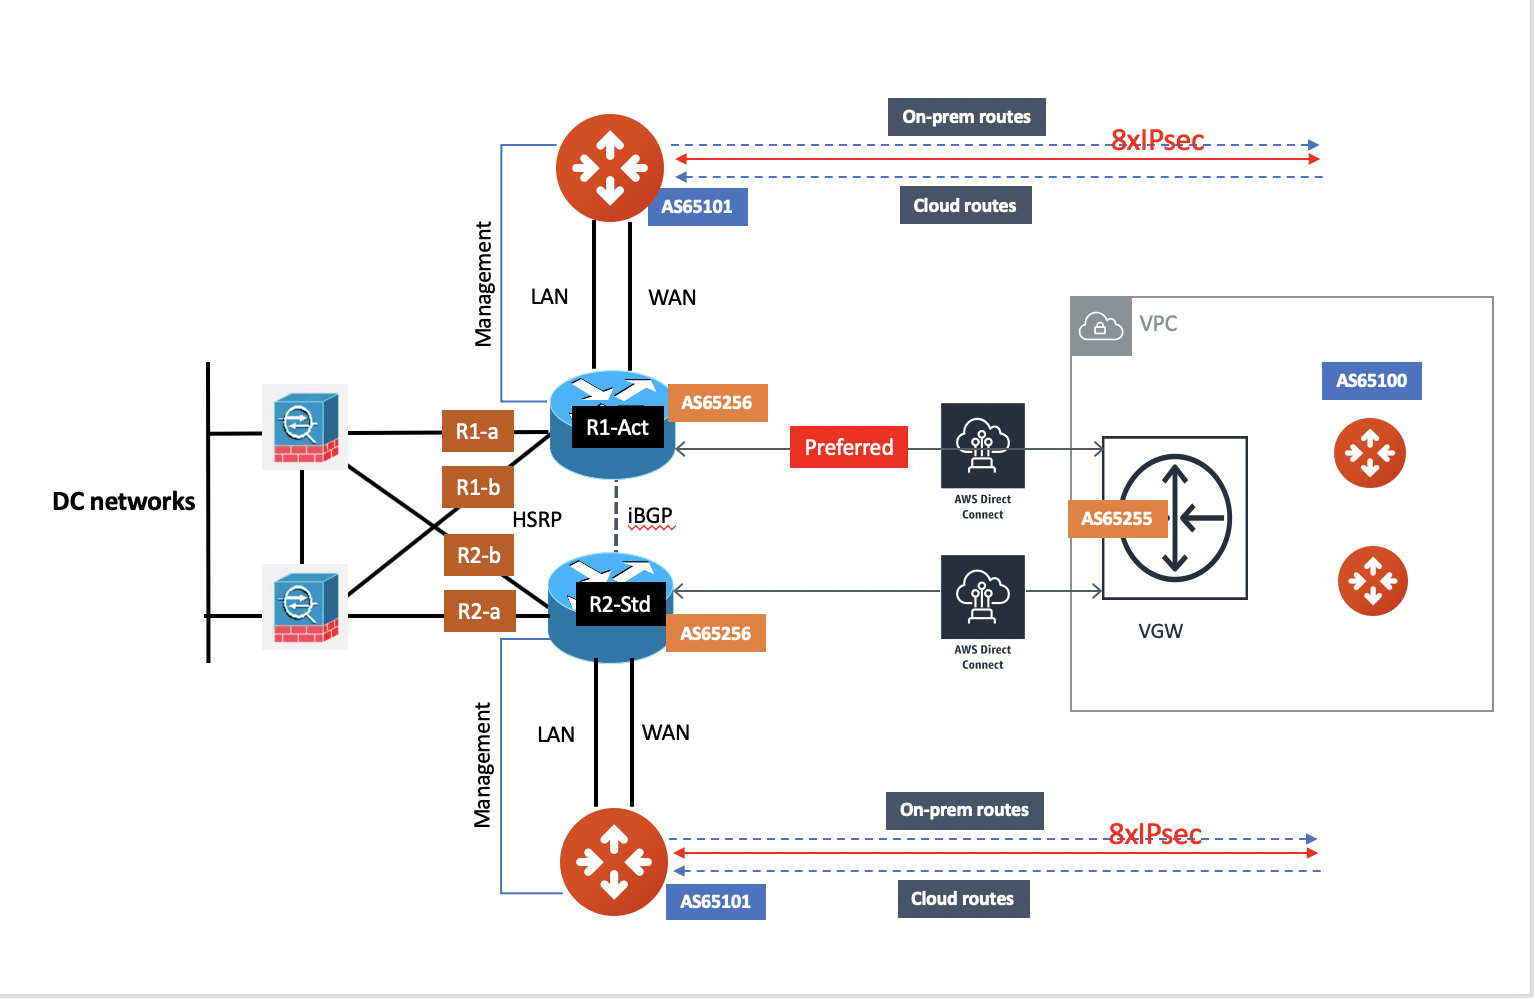
Aviatrix solution supports Active/Standby deployment model, but one of the CloudN appliances and network connections stays at standby/idle mode.
To deploy this topology, on-prem LAN router must advertise longer BGP AS_PATH to the Standby CloudN to ensure traffic direction from cloud to on-prem always routes to the Active CloudN when the connection is up. Once the connection on the Active CloudN is down, traffic will be directed towards the Standby CloudN based on BGP info. When the Active CloudN is recovered, traffic will switch back to the Active CloudN as it has shorter BGP AS_PATH length.
Users can utilize Connection AS Path Prepend for the traffic direction from on-prem to cloud depending on requirement.
Updating the new Aviatrix Controller Public IP for Managed CloudN
-
Navigate to Settings > Advanced > Registration or select Managed CloudN under the UseCases dropdown menu on the top on CloudN GUI.
-
Find the Register CloudN as a Gateway section and enter the new Aviatrix Controller public IP.
It is highly recommended that a FQDN name is used instead of an IP address for enhanced security and controller HA. -
Click Register.
-
Click OK.
Migrating a Standalone CloudN to a Managed CloudN
-
Upgrade Aviatrix Controller and CloudN appliance to the latest versions.
Registering CloudN with the Controller as Managed CloudN does not require to upgrade CloudN appliance to the Controller version. -
Remove or delete any Site2Cloud (IPsec) connection between the Aviatrix Transit Gateway and Standalone CloudN.
-
Follow the instructions in this document.
