Deploy Aviatrix Controller through CSP Consoles
This guide provides step-by-step instructions for manually launching the Aviatrix Controller in AWS, Azure, and GCP using their respective cloud consoles or CLI tools.
Prerequisites
-
An active AWS, Azure, or GCP account with the required permissions
-
IAM roles and policies
-
Security group or firewall rules allowing required ports
Deploy Aviatrix Controller in AWS Console
Create IAM Role
-
Sign in to the AWS IAM Console.
-
Navigate to Roles → Create Role.
-
Select EC2 as the trusted entity.
-
Attach the Aviatrix IAM Policy. See AWS IAM Policies.
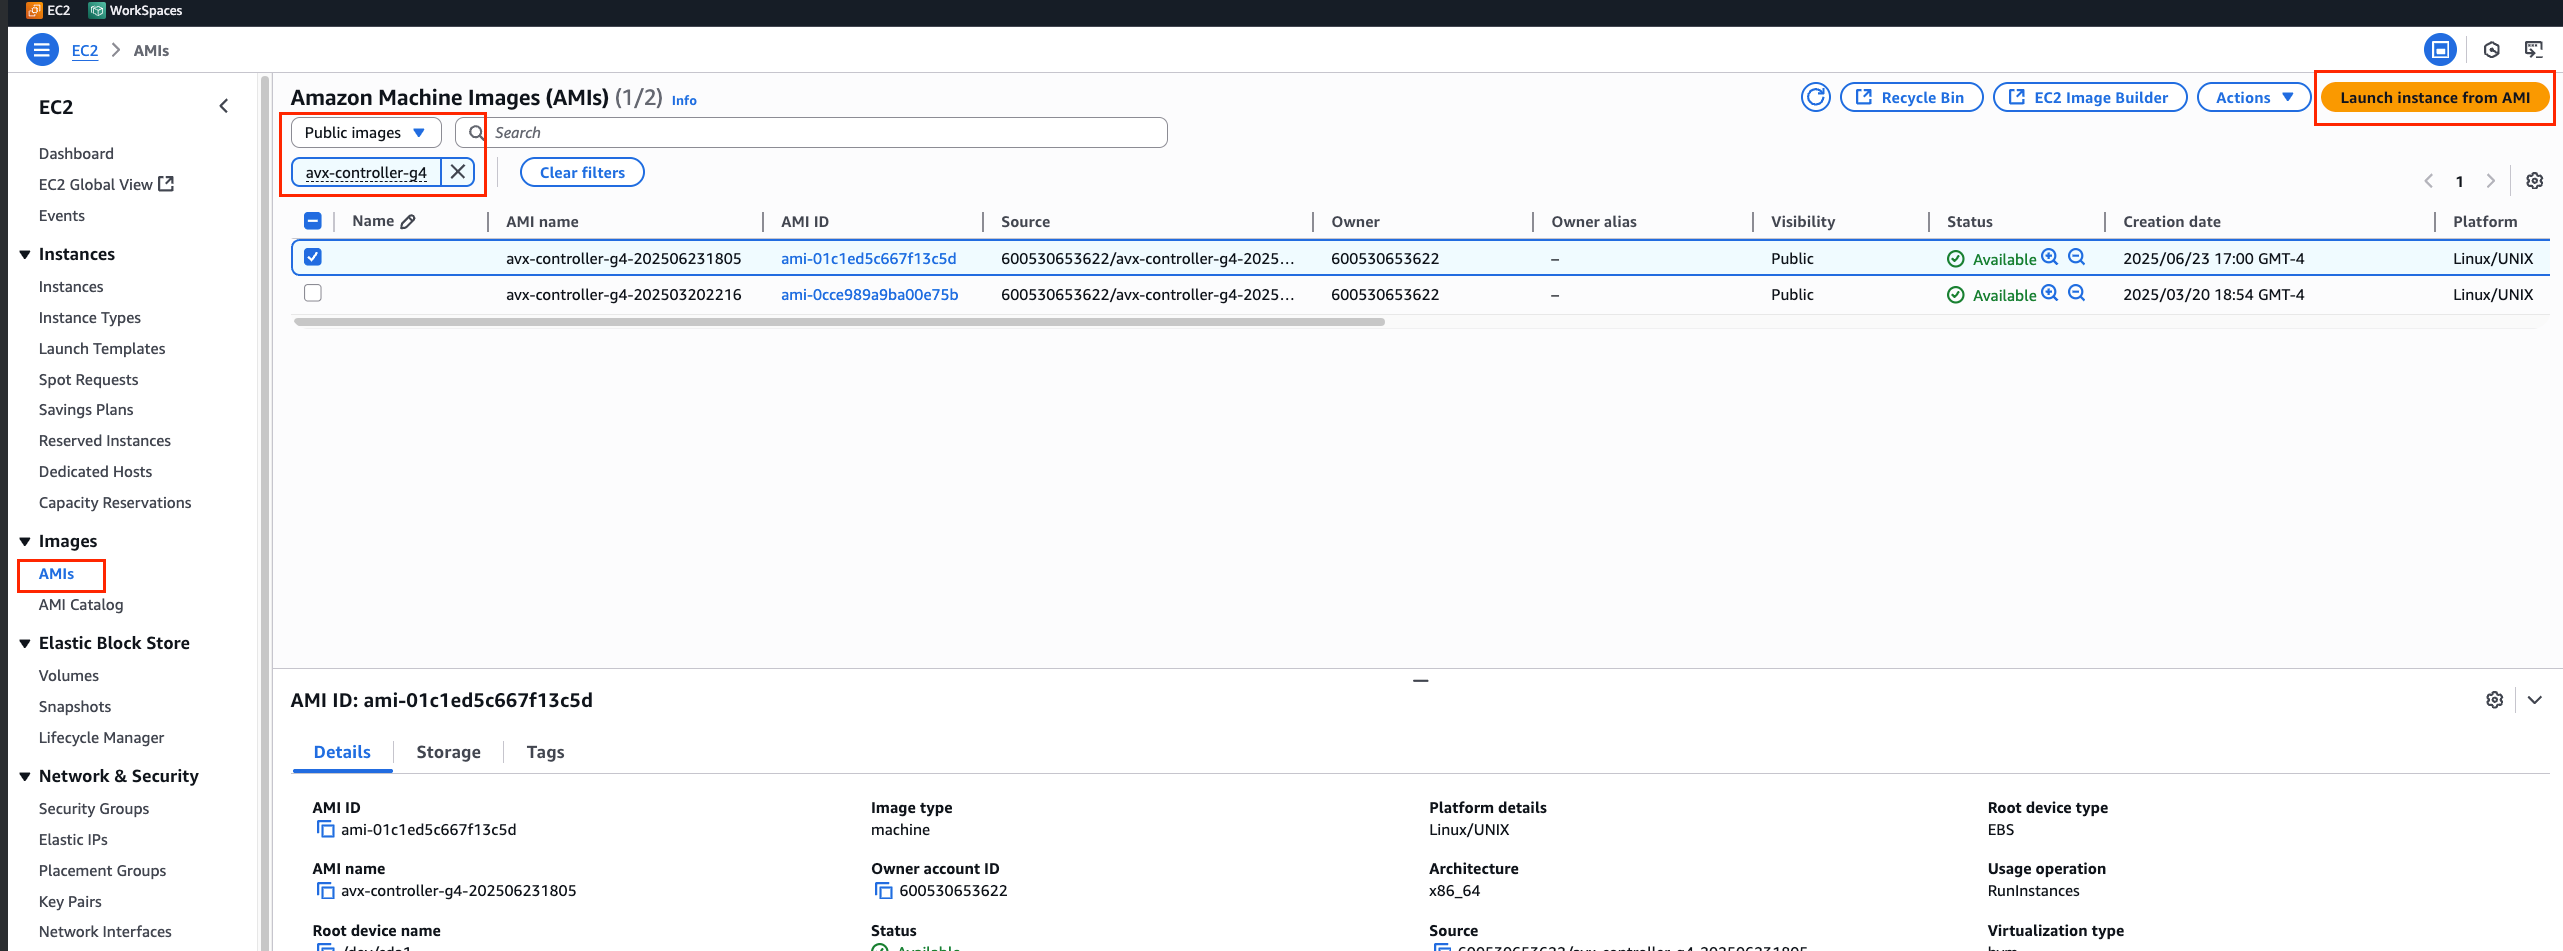
Launch EC2 Instance from AMI
-
Go to the AWS EC2 Console.
-
Click AMIs on the left-side menu.
-
Search for
avx-controller-g4from the Public images tab. -
Select the latest image.
-
Click Launch instance from AMI.
Configure Instance Details
Follow the steps below to configure the instance details:
-
Enter an instance name.
-
Choose an instance type (must be
t3.largeor larger). -
Select or create a key pair. Download and store the
.pemor.ppkfile securely. -
Network settings:
-
Choose the appropriate VPC and subnet with a route to the Internet.
-
Enable auto-assign Public IP.
-
Create or select a security group allowing inbound traffic on ports 22 and 443.
-
-
Storage configuration as needed.
-
Under Advanced Details:
-
Set IAM Role to
aviatrix-role-ec2.
-
-
Review and launch the instance. Wait until its status is
running.
(Optional) Associate Elastic IP with your Instance
It is recommended to associate an Elastic IP with your instance for a stable public IP address.
-
Navigate to the Elastic IPs section in the EC2 Console.
-
Click Allocate Elastic IP address.
-
Select the instance and click Associate Elastic IP address.
-
Select the EC2 instance you just launched and click Associate.
Deploy Aviatrix Controller in Azure Portal
This section provides instructions for deploying the Aviatrix Controller in Azure using the Azure Portal.
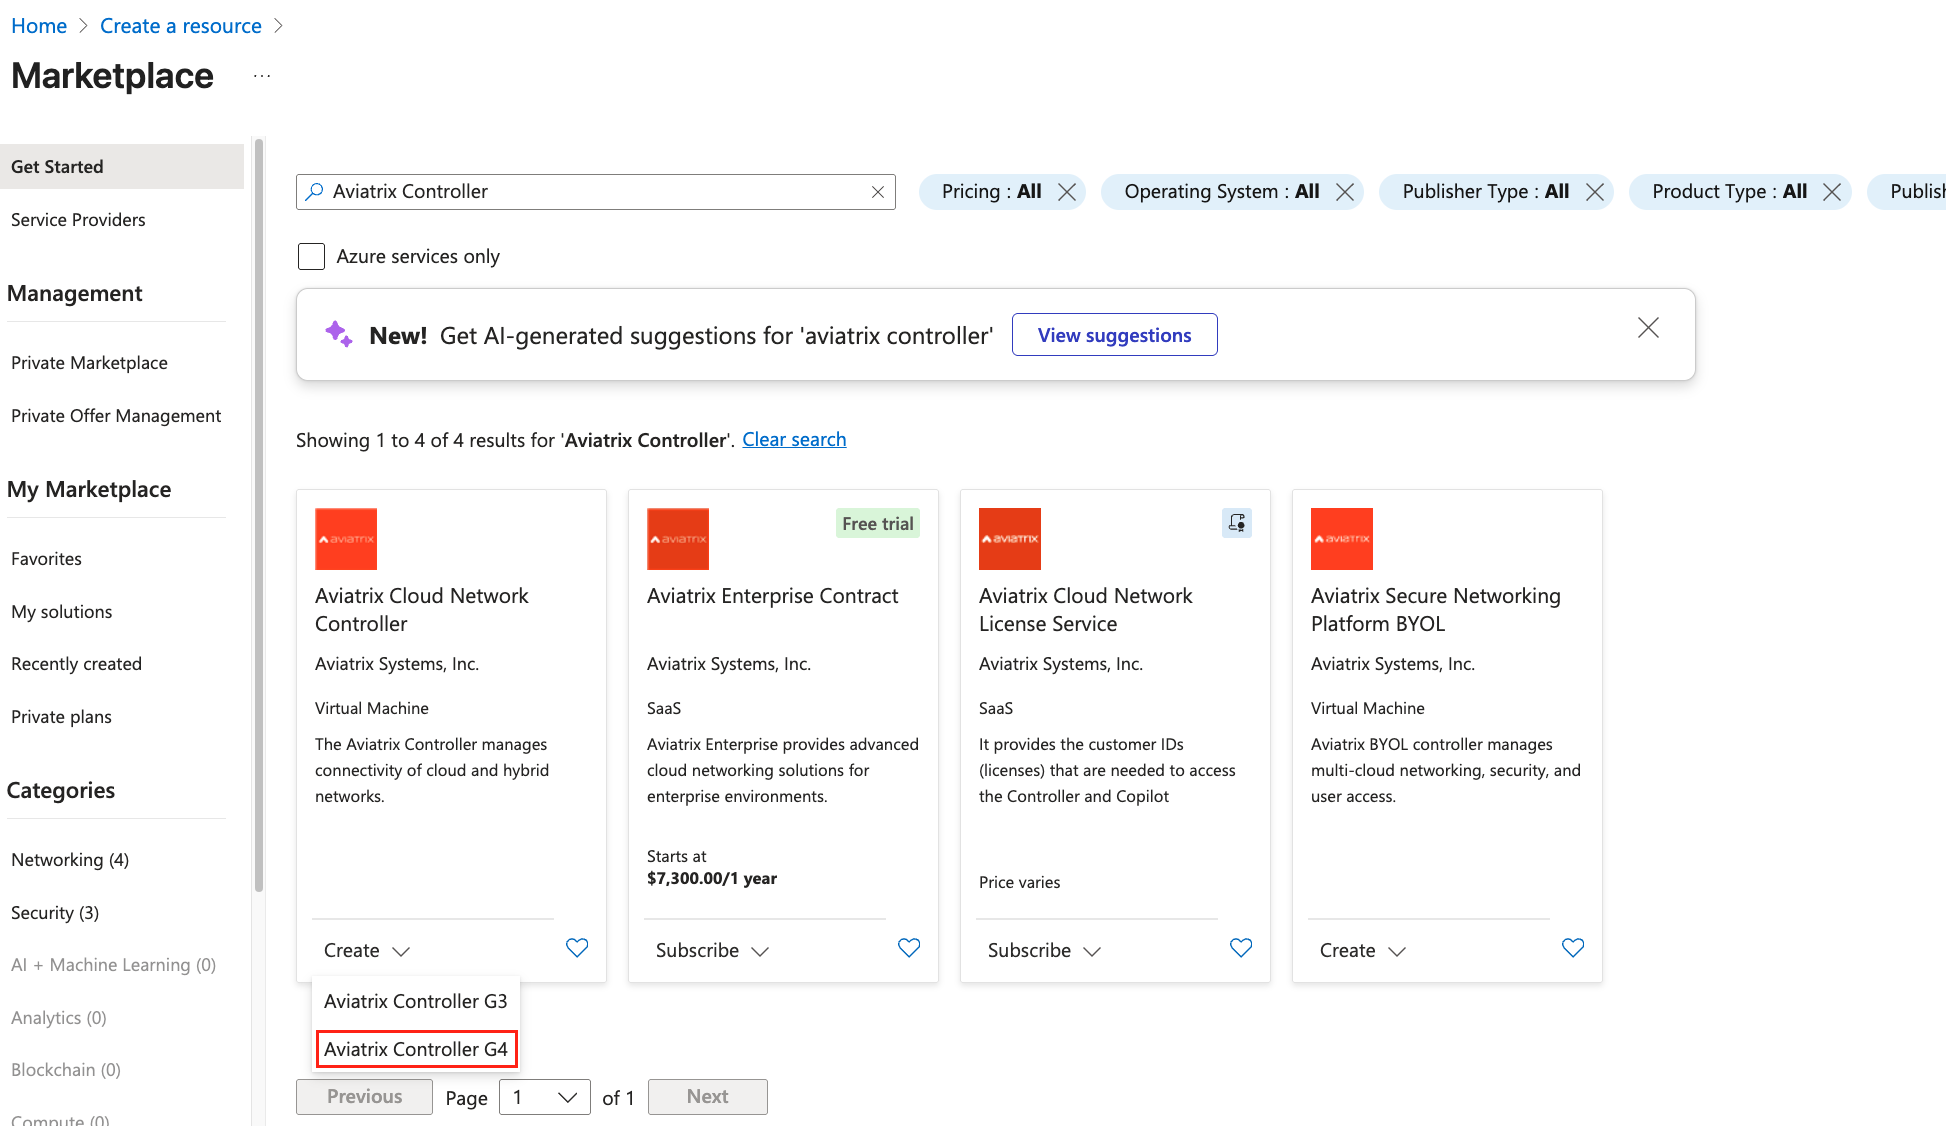
Launch from Azure Marketplace
-
Sign in to the Azure Portal.
-
Click Create a resource.
-
Search for
Aviatrix Controllerand select Aviatrix Cloud Network Controller. -
Click Create > Aviatrix Controller G4.
Configure VM Settings
-
Choose an existing Resource Group or create a new one.
-
Enter a VM Name.
-
Choose a Region (such as,
East US). -
Choose an availability zone.
-
Choose a security type (such as,
Standard). -
Choose a VM size (must be
Standard_D2s_v3or higher). -
Select Authentication type and SSH key.
-
For the inbound port rules, allow:
-
HTTPS (443)
-
SSH (22)
-
-
Under Networking, choose Virtual Network, Subnet and Public IP.
-
Ensure the subnet has a route to the internet (NAT Gateway or Internet Gateway).
-
For the public IP, you can either create a new one or use an existing one.
-
For the inbound port rules, ensure the following ports are allowed:
-
SSH (22)
-
HTTPS (443)
-
-
-
Click Review + Create to complete the deployment.
Deploy Aviatrix Controller in GCP CLI
This section provides instructions for deploying the Aviatrix Controller in GCP using the GCP CLI.
|
Due to recent changes in the Google Cloud Platform (GCP) portal, deploying the Aviatrix Controller through the portal UI is currently not supported. This section provides instructions for CLI-based deployment as an alternative. |
Prerequisites
-
A Google Cloud project with billing enabled
-
IAM permissions (Compute Admin and Service Account Admin)
-
An SSH key pair
-
Network and firewall rules allowing access
Install Google Cloud CLI
Make sure you have the Google Cloud SDK (gcloud CLI) installed on your local machine.
-
Official installation guide: https://cloud.google.com/sdk/docs/install
To verify that the gcloud CLI has been installed, run the following command in your terminal:
gcloud --versionInitialize Google Cloud CLI
After installing, authenticate and set your default project:
gcloud initThis command will:
-
Open a browser to authenticate your Google account.
-
Let you choose your Google Cloud project.
-
Optionally set default region/zone.
Launch from Google Cloud Marketplace
-
Go to the Marketplace and search for
Aviatrix Cloud Network Controller. -
Select the Aviatrix Cloud Network Controller.
-
Click Launch.
-
Click the Command Line tab. This tab shows you pre-filled gcloud commands that you can run from your terminal to deploy the Aviatrix Controller VM manually.
Reviewing the VM Image Path
Once you’ve launched from the Marketplace, copy the resource name of the VM image under Review VM images. It will resemble this format:
gcloud compute images list --project=mpi-aviatrix-public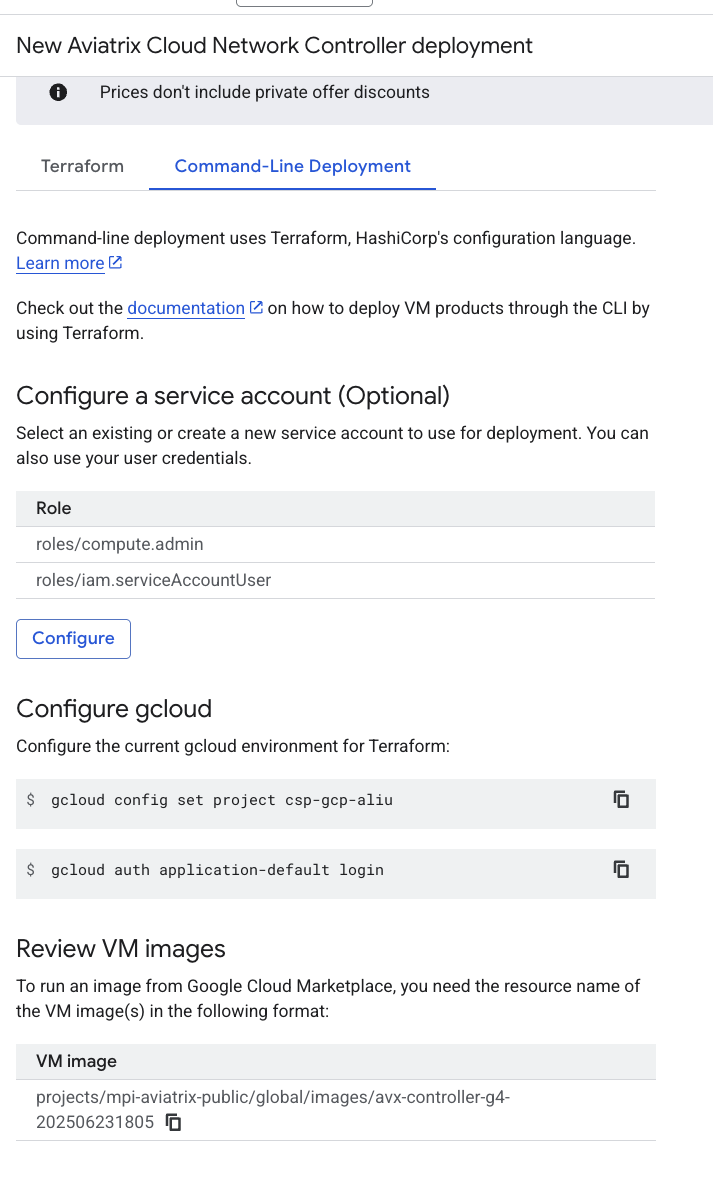
Preparing for Command-Line Deployment
Deploy via gcloud CLI
Use this command to deploy a VM with the Aviatrix Controller image. Replace <instance-name> with your actual values.
gcloud compute instances create <instance-name> \
  --zone=us-central1-c \
  --machine-type=e2-medium \
  --image=projects/mpi-aviatrix-public/global/images/avx-controller-g4-202506231805 \
Example:
gcloud compute instances create avx-controller \
  --zone=us-central1-c \
  --machine-type=e2-medium \
  --image=projects/mpi-aviatrix-public/global/images/avx-controller-g4-202506231805 \
Create Firewall Rules
Open the required ports to access your VM.
Allow SSH (port 22)
Run the following command to create a firewall rule that allows SSH access, where <YOUR_PROJECT_ID> is your Google Cloud project ID.
gcloud compute firewall-rules create allow-ssh \
  --network=default \
  --allow=tcp:22 \
  --source-ranges=0.0.0.0/0 \
  --project=<YOUR_PROJECT_ID>
Allow HTTPS (port 443)
Run the following command to create a firewall rule that allows HTTPS access, where <YOUR_PROJECT_ID> is your Google Cloud project ID.
gcloud compute firewall-rules create allow-https \
  --network=default \
  --allow=tcp:443 \
  --source-ranges=0.0.0.0/0 \
  --project=<YOUR_PROJECT_ID>
Optional: Internal Traffic
Run the following command to allow internal traffic within your GCP network. This is useful for communication between VMs in the same network, where <YOUR_PROJECT_ID> is your Google Cloud project ID.
gcloud compute firewall-rules create allow-internal \
  --network=default \
  --allow=tcp,udp,icmp \
  --source-ranges=10.128.0.0/9 \
  --project=<YOUR_PROJECT_ID>
(Optional) Set Up the GCP Service Account
After deploying your Controller VM, create a Service Account for Aviatrix to manage your GCP environment.
Create Service Account
You can use an existing Service Account or create a new one specifically for the Aviatrix Controller. If you choose to create a new one, follow these steps:
-
Go to the Google Cloud Console.
-
Go to IAM & Admin > Service Accounts in the Cloud Console.
-
Click + CREATE SERVICE ACCOUNT.
-
Fill in:
-
Service account name
-
Service Account ID
-
Description: Service Account for Aviatrix Controller
-
-
Click CREATE AND CONTINUE.
Post-Deployment Setup
After deploying the Aviatrix Controller, you need to complete the initial setup to configure it for your environment.
Initial Setup of Aviatrix Controller
Follow these steps to complete the setup of your Aviatrix Controller after deployment:
-
Enter the public IP of the instance in your browser to access the Controller UI.
-
Login the Controller UI using the default credentials:
-
Username:
admin -
Password: <your private ip>
-
-
Follow the setup wizard to change the Controller UI login password.
-
Enter email address for password recovery.
-
Enter your Customer ID.
-
Click RUN to complete the Initial Setup.
-
Onboard Cloud Accounts
After the Controller is set up, you can onboard your cloud accounts to manage them through the Aviatrix Controller. Follow the specific onboarding guides for each cloud provider.
Onboard your AWS Account in Aviatrix Controller
After the instance is running, you need to onboard your AWS account in the Aviatrix Controller. See Onboard AWS Account for detailed instructions.
Onboard your Azure Account in Aviatrix Controller
After the VM is created, you need to onboard your GCP account in the Aviatrix Controller. See Onboard GCP Account for detailed instructions.
Onboard your GCP Account in Aviatrix Controller
-
Access your Aviatrix Controller Web UI via its External IP:
https://<Controller-External-IP> -
Go to Cloud Accounts.
-
Click Add New Account.
-
Select GCP as the Cloud Type.
-
Upload the JSON Key File you downloaded.
-
Name the account and save.
The Controller now has permissions to manage GCP resources in your project.
See Onboard GCP Account for more detailed instructions.