Managing Access Accounts
Access Account
The Aviatrix Platform is a multicloud and multi-accounts platform. The Aviatrix Controller uses your cloud provider API credentials to make API calls, for example, to launch an Aviatrix gateway instance, on behalf of your cloud accounts.
One cloud credential is represented as an Aviatrix access account. The Aviatrix Platform supports multiple Aviatrix accounts. One Aviatrix account can have multiple service accounts from different clouds, one from each cloud. For example, an Aviatrix account name DevOps can have an access account for AWS, Azure ARM credentials, and GCP credentials.
-
An access account for AWS only consists of the 12-digit account ID.
-
For Azure, the account information consists of Azure ARM credentials.
-
For GCP (Google Cloud), the account information consists of GCP Credentials.
-
For AWS China, please refer Account with Access Key.
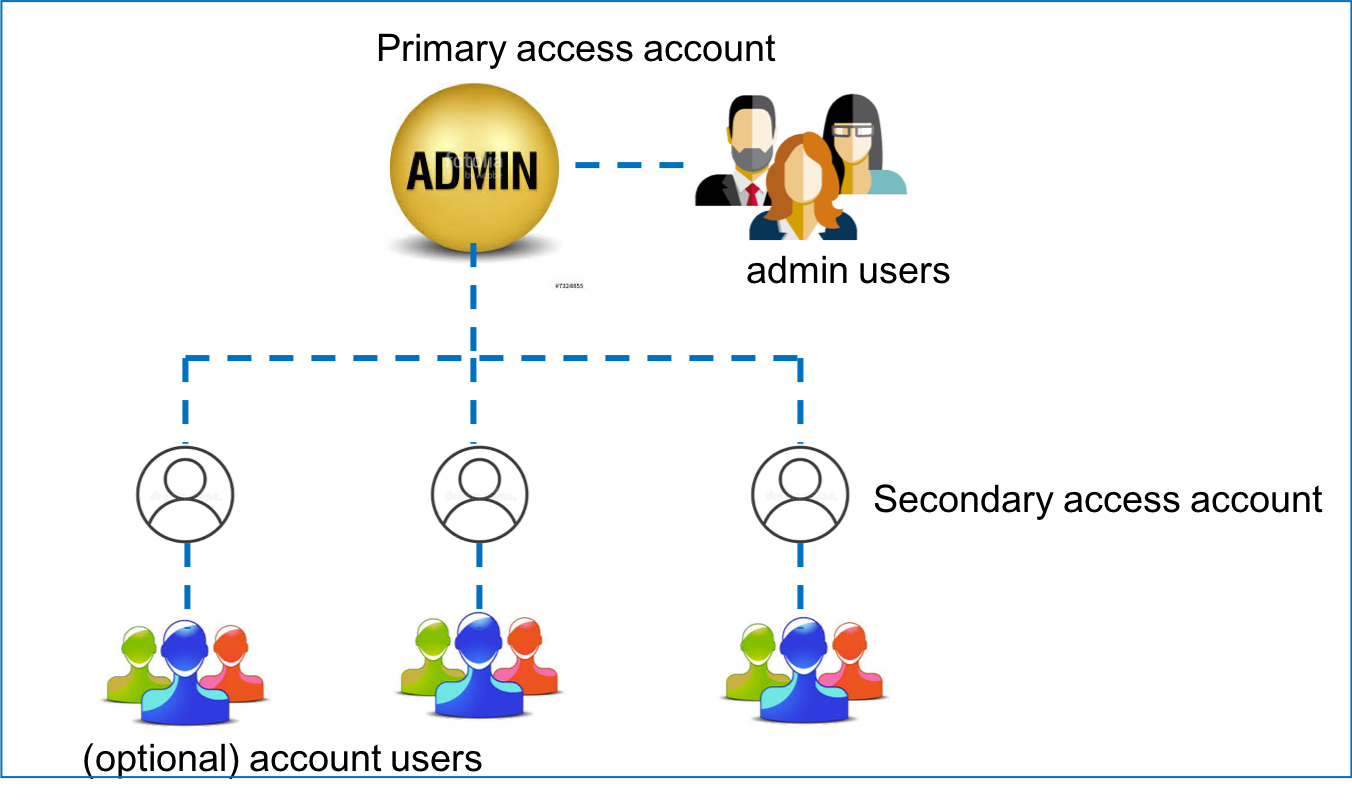
The Aviatrix account structure is shown in the diagram below, where admin is the default user for the primary access account.

To add more admin users, refer to Admin Users and Duo Sign in.
Aviatrix Primary Access Account
There is only one primary access account on the Controller. This primary access account is the one you used to launch the Controller through the AWS, Azure, GCP, or OCI marketplaces. For example, if you launched your Controller through the AWS marketplace, your primary access account is an AWS account.
After setting up your primary access account, you can:
-
Launch Aviatrix Gateways in the VPC/VNets that belong to this account.
-
Add access accounts from other Cloud Service Providers. For example, if you launched your Aviatrix Controller through the Azure marketplace, your can add access accounts for AWS, GCP, and OCI.
Aviatrix Access Account Best Practices
An Aviatrix Cloud Account corresponds to one cloud account of one cloud type. You can create multiple Cloud Accounts to support multi cloud and multi account deployment environment.
Setting Up Additional Access Accounts for Different Clouds
After you go through the onboarding process and create the primary access account, you can create additional Aviatrix access accounts on the Controller. This allows you to launch gateways and build connectivity across different cloud accounts. For example, if you create a primary access account in Azure, where you launched your Controller, you can add additional access accounts for AWS, GCP, and OCI.
To launch an additional access account:
-
Go to your Aviatrix Controller > Accounts > Access Accounts.
-
Click + Add New to create this new access account.
-
Enter a unique account name: for example, BU-Group-3.
-
Mark the radio button for the appropriate Cloud Service Provider. The fields below change based on which Cloud Service Provider you chose. See the following documents for more information on adding access accounts in each cloud:
-
If you launched your Controller in Azure, GCP, or OCI, leave the IAM roles checkbox unmarked for any additional AWS access accounts.
-
-
After entering the information required, scroll down and select any RBAC or permission groups this account should belong to.
-
Click OK.
-
The new access account is created.
-
Now you can create connectivity between two VPC/VNets in different cloud accounts.
Setting Up Additional Access Accounts Using Terraform (AWS)
If you use Terraform to create more AWS access accounts, you need to run the CloudFormation script on each secondary account first, then use Terraform account resource to create the account.
The CloudFormation is necessary to create IAM roles and policies and to establish a trust relationship with the primary account (the account where the Controller is launched.)
Auditing a Cloud Account
To audit a cloud account:
-
Go to Cloud Resources > Cloud Accounts.
-
Select the name of the cloud account you wish to audit. The account’s information opens in a panel on the right.
-
In the panel, click on the More icon (three dots) and select Audit Account.
-
The Audit Report displays:
-
Status - Pass, Warning, or Fail.
-
| If the audit fails, CoPilot sends out alert email and logs the event. In addition, CoPilot sends an alert email on behalf of any of the above condition failures reported by an account upon the first detection and subsequently every 24 hours until the problem is rectified. |
-
Comment - Any comments about the account, especially if the audit failed.
-
Timestamp - The time and date of the audit.
AWS: Viewing and Update Account Policies
For AWS cloud accounts, if the audit status is Warning or Failed, you can review the account’s IAM policy. Exit the Audit Report and review the information in the panel on the right.
-
Click View Policy to view the account’s policy.
-
Click Update to update the account’s IAM policy.